First things first, if you want to get the most out of ProTools, YOU MUST LEARN AND COMMIT TO THE KEYSTROKES. It isn't easy at first, but if you use them enough, they will become second nature.
 What is a keystroke??? I want to copy this line and paste it somewhere else.... You highlight the line, click or more recently only ⌘ (command) and the letter C to copy then V to paste. That is a keystroke. These will make your work flow in ProTools quicker and start you off on a good note.
1. Open ProTools and create a new "Session" by clicking Create Blank Session... and hitting okay. Some other options to choose in this dialog window are
- Open Recent Session
- Open Session...
- Create Session from Template - templates are useful when you get a set up that you like and need for multiple projects.
- For example, when I recorded my album, I had my drummer (the first real instrument I tracked, or recorded) come in for 6-8 hours a day for two days. I had 10 songs for him to track and each session took me a good 20 minutes to set up and text before tracking. So, after the first session was made, I saved it as a session template so that when I moved on to the next song, I didn't have to waste time! I recommend using templates AFTER you are fluent in the setup process because these skills will open so many doors I promise :D

As you create more sessions, it will get harder to manage them, UNLESS you are organized and mindful, as I have had to learn over the course of lost sessions, hours of work wasted, and frustrating protools life lessons!
Just to clarify, I will use ">" to reference hierarchies to finding where things go and are.
For instance File > Save As...
As you can see, I saved this session as Practice Session 4/10/13 Stephens in
Local Documents > MMus > Create your folder here > Stevie Rae Stephens
Click Save and bam, this comes up and you are ready to rock n roll.

This is your session window!
3. Let's make a track. A track is something you all have seen before, but in case you aren't 100% sure, it's the thing that you record types of audio onto in the DAW (DAW = Digital Audio Workstation; examples of other DAWs are Reason, Logic, or Garageband).
Here is your first Keystroke, and one of the most important (because it works in many other applications, not just in ProTools!)
- Shift N - In newer Macs, the is actually ⌘ (Command), but it's easier for me to just put the symbol in. This keystroke creates a new track by bringing up the New Track Dialog Window

- Audio Track - Use audio when you are recording through microphone(s) or when you are using an instrument that is plugged into the interface (i.e. bass guitar, electric guitar, keyboard)
- Aux Input - Use auxiliary input tracks when you need bus and send returns. (I'll explain a little more later on)
- Master Fader - This should already be in the session (1. Flaw in ProTools). This track's fader will govern all the other tracks in the session including aux and instrument tracks.
- MIDI Track - Use MIDI when you want to input MIDI messages, mostly from external sound hardware. Originally, MIDI tracks had to be used in tandem with auxiliary inputs to play and monitor the sound, but now the Instrument track is a combo.
- Instrument Track - Use instrument when you want to input MIDI messages and hear what you are playing using a virtual instrument provided in ProTools. Basically, use this one with MIDI.

- Remember, if something isn't clear, make a mental note and either FB message me, text me, or ask me on Monday or whenever and I can clarify more :D
I use STEREO for my Auxiliary Input tracks. Again, I will explain further later down the line.

Before you click create, think ahead in case you might want more than one track. The next keystroke you might want to know is
 Shift Up/Down Arrow - This will create more tracks in the New Track Dialog Window.
I use this tool when I know I am going to need multiple tracks (i.e. 8 part harmony backing vocals, drum recording, or multi-tracking).
This is what will show up. This is your brand new AUDIO track.

 On the left side of the track, you will find the label (I double clicked the white part, which will originally say Audio 1, to rename it).
This is another way to demonstrate good file management because once you start recording, cutting, moving, and changing the audio you record, ProTools will name it accordingly. If I leave the track name as Audio 1 and record a vocal, the vocal take will be labeled in my ProTools Audio Files Folder as Audio 1. Not Stevie Rae Lead Vocal, or Guitar Neck Left, or Snare Mic, whatever.
LABEL your tracks!

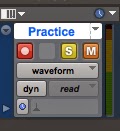
 The left most button controls the size of the waveform. It comes in handy when you want to really zoom into the waveform for insane editing. This button is awesome if you remember it's there. If not, you end up with a fat block of audio that looks like this....
------------------------------------------->
And your class notes end up looking like this...

Back to the Waveform zooming tool... Using this tool isn't the same as zooming in or out, its actually making the audio waveform bigger or smaller. I like to set this tool 4 clicks up from the smallest it goes. That usually gives me a better representation of the waveform in terms of volume and clipping.
Clipping is when the signal being received by ProTools is too loud (hot) causing information loss. You will see the meter on the track hit the red when this happens. Simply ease off of the gain knob on the interface.
I am skipping over the button with the little blocks.
The third button in is the actual zooming tool, which you will never use.
Because of KEYSTROKES! The next two keystrokes you will have to get in bed with are R and T, zoom in and zoom out. These are very useful and will enhance your workflow exponentially!
Next is the highlighted Smart Tool. The Smart Tool is the grouping of the Trimming Tool, the Selecting Tool, and the Grabber Tool! These are grouped together because they are used often and when you select the Smart Tool, ProTools actually gets smarter ;)
With this tool selected, when the mouse is at either end of the audio, it will turn into the TRIMMING TOOL, when on the upper half of the audio line, the mouse becomes the SELECTING TOOL, when under the line, the GRABBER TOOL comes through, and when in the upper corners, the FADER TOOL steals the show.
Toggle through these tools by using the Escape Key keystroke.
Moving on.
Here is a session of mine I opened to show some basic editing. I have selected a few of the tracks because I want to cut out all the silence at the beginning. This is called useless information that ProTools uses processing power to think about while recording or playing back.

So, I cut it out by using the Keystroke E - Splits the region, or selected tracks, at the cursor.

Then I just delete the empty spaces I created. You can also use the Trimmer Tool to drag the selected audio start or end to where you want it. This tool looks like [ or ].

Then I decided that the audio waveforms were a little too big and blocky for my taste and I used the waveform zoom tool to make them more appealing to my eye.

The next Keystroke you should learn is = - Use this keystroke to toggle between your Mix Window and your Session Window. This is what should appear when you use =

Next, you should know about the Modes of trimming and editing. There are 4 modes and you can toggle through them by using the `/~ (Tilda/Open Accent) Key keystroke.
The modes include
- Shuffle - Try not to use this mode unless you have a particular use for it. I'll show you why in person because it's weird to explain.
- Spot - This will bring up a window asking where the spot is you want to edit.
- Slip - Use this when you want to freely edit audio.
- Grid - Use this when you want to edit audio according to the grid.


If you want to adjust the grid in which you are using to edit, click on the musical note next to Grid and select the value. You have options from whole notes to sixty-forth notes.
Next to that tool is the mini transport with the stop button and the loop playback button for when you want something to play in a loop.
Also, none of these keystrokes will work if you don't have this dumb little a/z button clicked and highlighted yellow.
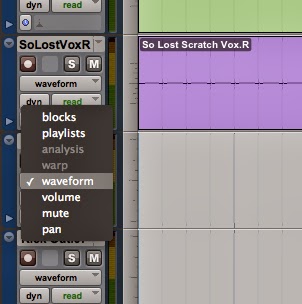
Here is where you will find your fine volume adjusting and muting and panning. As you explore with more plugins and such, you can assign more automate parameters.
That's for later.
Playlist is awesome in ProTools because you can save all your different takes of recording passes there and pick and choose from the different audio takes later in the editing process.
I will show you later in person.

Next, you should know how to create a click track.
If you struggle or refuse to play/practice/record to a click track, you might want to start using it now. It gets easier I promise.

(There is no keystroke to make a click track in ProTools. 3. Flaw)
Go to Track > Create Click Track
The click track will show up and is colored green, whereas audio tracks are blue.

Just a suggestion - I always change the default sound of the click to Marimba II because it honestly is the least obnoxious of the presets. Food for thought.
You can see the dialog box on the right that comes up when you click on the little tab called Click. You can adjust a lot of settings about the click here if you so choose.
Now, how to use a click.

Use a click so you can play in time with the tempo you have chosen for your project. In this case, ProTools defaults to 120 bpm, or beats per minute. You can change the tempo by clicking on the little red button next to the quarter note and the number 120 and this dialog window comes up. Make sure the location is like this if you want to change the whole project's tempo. Same thing goes for the meter, but in the meter section.

Click the red record enable button to let the track know you want it to record audio.
I recorded some audio. I was clapping loudly into the mic.
(Keypad) 3 - this is the keystroke to start recording.
Now let's add some reverb to the audio I recorded because most times, vocals and other instruments will sound nice with some reverb!

Wow, this screen shot didn't turn out so hot. Sorry about that. It says 1 Stereo Aux Input.

I know its hard to see the words here so I'll type them out.
Inserts > Multichannel plug-in > Reverb > D-Verb
I like using D-Verb because it seems to be more user friendly, but you should try out the others in case you find the perfect preset or settings that work for you.

I like the preset Vocal Plate, but try whichever ones you want.
I actually usually change the size to small or medium depending on the song, but I forgot here.
Now to bus.
Bussing is exactly what it sounds like. Signals sitting on little busses that take them somewhere else.

This is the first step to understanding signal flow, which will come in handy as you get more familiar with the basics.
So I am going to bus the clapping I recorded on the audio track to the auxiliary track with the reverb on it. Why is this better than just putting the reverb plug-in on the audio track itself? Because now, you can bus other audio tracks to this auxiliary reverb track giving your computer a break and giving your project a glue like feel when all the reverb is so cohesive coming from one source!
Sorry again for the fuzziness.
On the Aux Track,
Input (No Input it says) > bus > Reverb
It's nice that there is automatically a named bus ready for you to use. You can see the others that are there as well.
Now, go over to your Audio Track and under the sends section,

Sends > bus > Reverb (Stereo)
Since you assigned that particular bus to be in use on the Aux Track, it will be highlighted yellow when you go to select it on the audio track.
Now you can Option/Alt drag the little bus tab to other tracks you want to send to the aux reverb later.
 If you are struggling with these last few concepts, or all of them, I promise it will get better and it might be easier to see in person :) Don't stress because my teacher was drawing little busses on the white board for me and my class when we learned hahah
What happens now is a little floating aux fader will pop up.
Its fader will be all the way down and you will not hear any of the reverb until you pull the fader up to unity (zero). This is very dumb because it should just default to unity. (4. Flaw)
 So, if you don't hear anything, make sure you pulled up the fader using the keystroke Alt Click
Alt Click will actually send any type of fader (pan pot, volume, automation) to unity gain, or zero.
Now, when I hit the space bar to play, you can see how the audio is being sent to the bus. I can explain further about busses and the little pop out window and what it does.
Next, lets add an Instrument track for some MIDI piano.
 Use Shift N to create the new track, select Instrument from the drop down menu and click create.
Toggle to the Mix window using = and in the instrument track's insert section, we will add the virtual instrument.
A great virtual instrument that comes with ProTools is MiniGrand. When used right, you can actually come up with some awesome sounding piano.
Inserts > plug-in > Instrument > Mini Grand (Mono)
You will see a plug-in of a piano pop up and it will take its sweet time getting set up for you.
Below is Mini Grand. You can adjust the settings or find a preset in the drop down menu that you like.
Fortunately, the pods are pretty much all wired and set up correctly to just work when Mini Grand or any other virtual instrument is used.

Now, you need to record enable the Instrument track and record some MIDI.
MIDI = Musical Instrument Device Interface.

It is not actually audio, but rather a series of values that indicate the velocity, duration, and note on a scale of 1 to 127.
I can show you how MIDI can be fun and helpful in certain situations later.
So, I record enable with Keypad 3 and go for it.
This is what MIDI will look like after you are finished recording.

The great thing about MIDI is that I can toggle the MIDI Editor Window by using the keystroke
Ctrl =
And from there you can do wonders from adding notes you want, subtracting ones you don't want, etc.
You can see in my MIDI Editor Window that my notes are all off and out of time.
 Introduction to the amazing Quantize! To quantize these notes, or have them snap into their rightful places according to the tempo and meter you have set, use the keystroke
 (Keypad) 0 - Brings up the Event Operations Window with the option to Quantize your notes.

Sometimes the quantize doesn't get it quite right, so practice with a click so it doesn't have to guess and fail so badly! haha

Below you can see the difference the quantize made.
When I first learned about this awesome tool, I had a lot of fun with it. Until I realized that when you quantize things like this, you end up with a very inhuman feel. There are shortcuts to varying the degree of quantization so that the human is still obtained, and I will show you later.
FINALLY!
Let's save this bad boy. Under File > Save you will be able to save all changes you made to your project and it will be completely updated.
 Save As is a different way of saving and it will ask you for a new name for your project because the original project will stay as it was last saved and the new Save As will be a copy of the original just with the changes. This is useful when you want to save the progress or you want to start over without doing the undo button 40,000 times!
Save Copy In, however; is a terrible idea unless you know how and when to use it. It destroys file management, I've seen it happen! So until you have a use for it, stay away from that option.
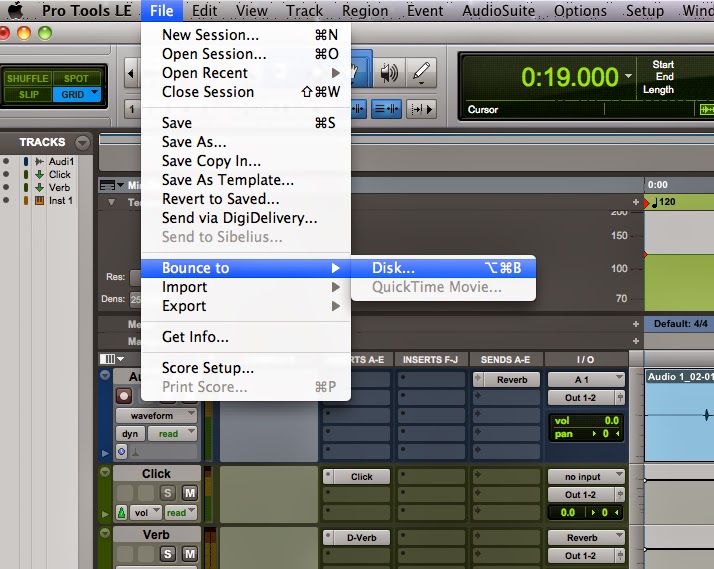
A bounce is basically a creating an audio file out of the entire project when you are finished or just want to have an mp3 or wav of the session.
To obtain this bounce, you must go to
File > Bounce to > Disk...
This will bring up the Bounce Dialog and your settings should look as follows below.
The only thing you might change is whether you want the bounce to be an .mp3 or a .wav
 The difference between an .mp3 and a .wav is that an .mp3 has been significantly compressed to be more efficient in size. Most songs on your iPods are .mp3s to reduce space. In the conversion/compression the audio will lose quality, however; these days the loss of quality can be negligible.
A .wav is something called a lossless format because it is printed as is will no compression. These will be better quality, but a lot bigger.
A good analogy is the difference between the photos you take on your iPhone opposed to the photos you take on a high definition SLR camera. The difference is obvious when the two are blown up in size, but on your phone's screen, you don't really see the detailed differences.
 Basically, and .mp3 vs. a .wav in your earbuds wont sound so different as they would on some awesome speakers or professional headphones.
Last but not least, this is a shot of what your ProTools folder will look like after your done. You will have your Audio Folder with all of your properly named audio files, your fade files in the fades folder, your plugin settings in the plugin folder, and so on...
I just now realized that the first few folders of this screen shot are off because I used slashes to part my dates, which will actually just produce a new subfolder. This is a great example of not paying attention to a simple detail leaving my ProTools folder off and the name of my session wrong. Dammit.

Anyway, you get the idea.
I really hope this blog helps, it took me all day to put together, so please use it as much as you want and ask me any questions. I would love to help make recording your new best friend :D
www.stevierae13.blogspot.com
~SR
No comments:
Post a Comment