Getting a good sound is more complex than just the quality of the sound source. When recording a sound, whether it be a vocalist, an instrument, or environmental sounds, the good rule is always something to be considered and followed.
1.30.12
I have always heard that miking drums is a pain in the ass, but learning about all the different ways to get a good sound yesterday, I feel like it has everything to do with understanding how microphones works and through practicing.
We learned about 4 different ways to mic drums with 4 mics, 2 of which are the same kind. Theses techniques are called the A/B style, X/Y style, Glyn Johns style, and the M/S style. Before going into how to place the mics for each style, I want to go over some of the important terms about miking techniques from the book.
The Good Rule: Good musician + good instruments + good performance + good acoustics + good microphone + good placement = Good Sound!
3:1 Distance Rule: For every unit of distance between a mic and its source, a nearby mic should be separated by 3x that distance.
Proximity Effect: Causes an increase in bass response whenever a directional mic is within 1 foot of the source.
 Directional Response: The sensitivity of the mic at various angles of the incident with respect to the front (on-axis) of the mic.
Sensitivity Rating: The output level, in volts, that the mic will produce, given a specific acoustic signal and input sensitivity rating.
Leakage: Whenever a signal is picked up by both the intended mic and a nearby mic, the signals can be combined during the mixdown process.
Equivalent Noise Rating: The electrical self-noise of the mic.
Frequency Response Curve: The measurement of output over the audible frequency range when driven by a constant, on-axis, input signal.
There are a few different kinds of microphones we used or will be using that I have drawn out for myself to recognize them easier.
As for miking the drums yesterday, we used the Sennheiser MD 421 to mic the bass kick drum, the Shure SM57 to mic the snare, and 2 AKG 414s for overheads.
The reason that dynamic mics are used in the kick drum is because dynamic microphones have a higher threshold and a lower frequency response.

<-----------------The X/Y Style. Think of this positioning as on an X/Y axis. The microphones are picking up sound from the opposite side of the kit in ration to where their stands are.

<-------------------The A/B Style. This is when the 2 overhead mics are on either side of the kit. The simple one conceptually.
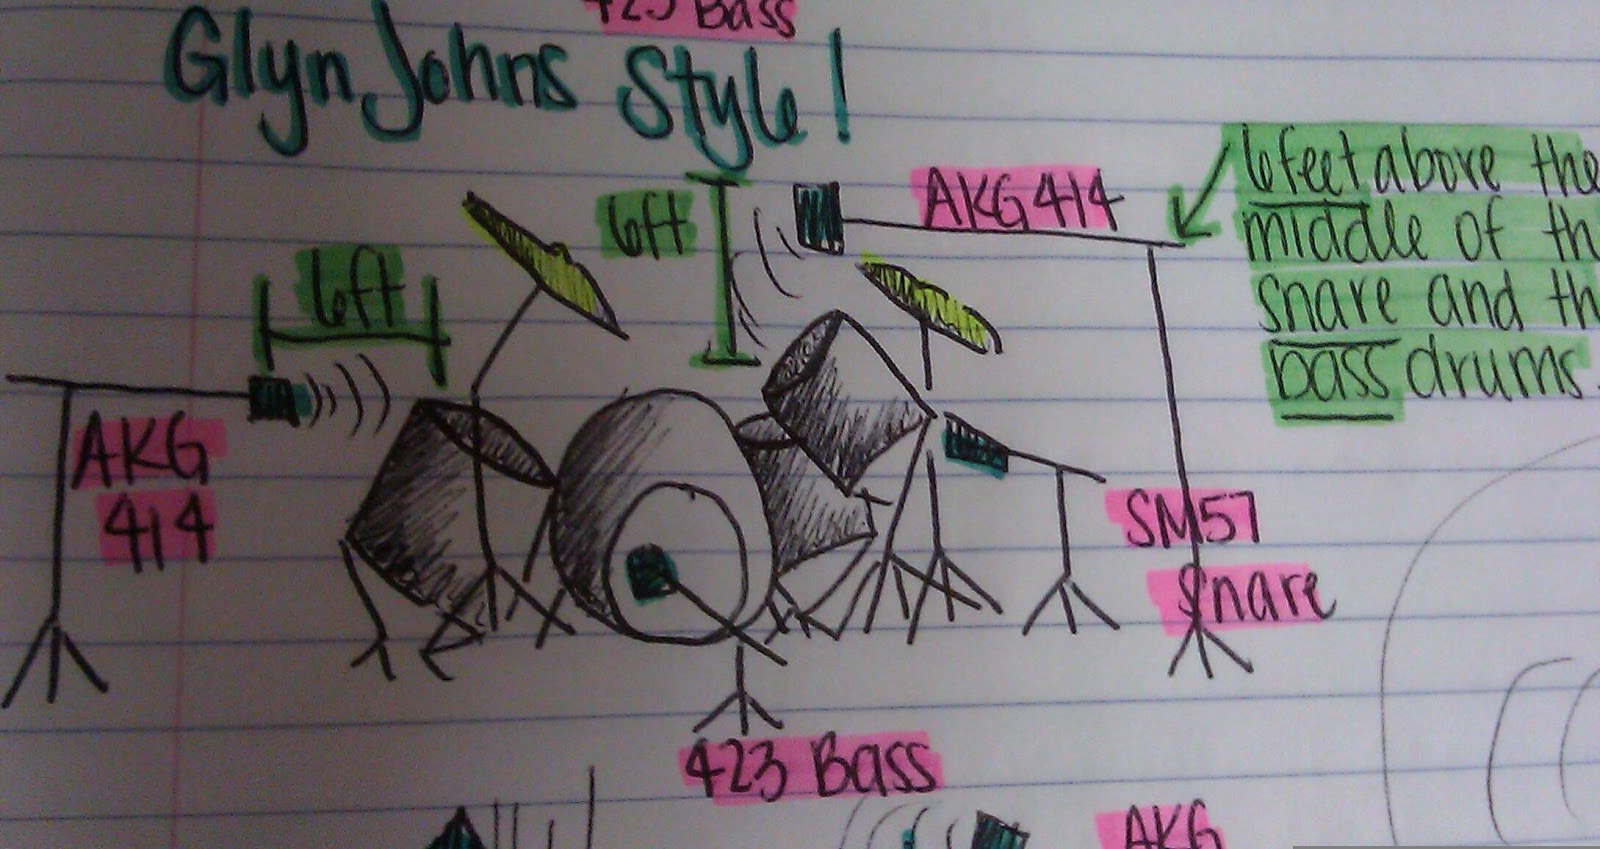
<--------------------The Glyn Johns Style. One overhead is 6 ft. above the kit between the bass drum and snare pointing directly downward, and the other is pointing at the kit 6 ft. away on the other side.

The M/S Style. ------------------>
This one is really strange and hard to grasp, but it sounded soooo good in the studio. Basically, one mic is pointing at the kit with a figure of eight polar pattern and with its null points facing the kit, and the other is above it point at the kit with a cardioid polar pattern and its accepting side facing the kit.
Honestly, I have no clue how this ends up working, but I have a feeling I'll figure it out later this or next or the next week.... hopefully!
In the lab, there was a specific way of setting these four tracks up. The M/S was the only one that had more steps.
So, you duplicate the side mic to get S and S1, or Side Prime, and on one of the duplicates, apply
TDM > Other > Trim to put it out of phase.
When putting a track out of phase, the volume of that track will automatically go down 10db and thus, should be slightly louder than the other duplicate. This creates a pretty awesome sound that really was mind-blowing!
Some really cool new key strokes we learned yesterday that will prove very helpful are....
- ; (semi-colon) P - Moves up and down the tracks!
- Shift S - Solo of selected track on
- Shift M - Mute of selected track on
- Shift R - Record enable for selected track
- Shift I - Turns on the Input Monitor for selected track.
Also, when the solo button is applied to the board track, protools wont record from the corresponding mic and it wont show up on the corresponding track! But, when the solo button is applied in protools, the sound is only soloed and it still is being recorded.

This is a drawing of how the cables must be placed on the board to achieve recording. On the other side of the wall, there is the patch panel that corresponds to the board as well. So, the bass mic is in patch panel 1, the snare mic is in patch panel 2, left overhead is in 3, and right overhead is in 4. Its not too difficult once you look at it a few times!
I'm dreading the rest of the plugs and what they do....
Thoughts
So, I had a pretty fun class learning how to set this all up and I can't wait for tonight... Or tomorrow morning's Improv class!


